Turning “Wow” Moments Into Real Scientific Thinking
The first few weeks of school are when I lay the foundation for what science looks and sounds like in our classroom. Most kids, even older ones, don’t always come in knowing how to observe, think, talk, or write like scientists. They’ve spent years doing science activities, without realizing how much thinking is happening right inside their own heads.
That’s why I love starting the year with Walking Water. It’s one of those simple experiments I’ve done every year for as long as I can remember. It’s colorful, quick, and easy to set up, and with just a few small adjustments, this familiar demo becomes something more: a powerful way to build scientific habits from day one. It also creates the perfect opportunity to model what it means to think like a scientist and helps students begin seeing themselves as scientists too.
When it’s used intentionally, this experiment can turn a simple “wow” moment into a meaningful “why” moment.
The Setup (and a Few Hard-Learned Tips)
If you’ve ever tried the Walking Water experiment and it didn’t quite work, you’re not alone. I’ve had my share of “oops” moments when the water moved too slowly or the color got stuck halfway before reaching the next cup. While it was the perfect chance to show students that scientists make mistakes, learn, and try again, this activity is much more exciting when it actually works.
Here’s what I’ve learned after this investigation was battle-tested in a few classrooms:
- Use the hottest water possible. Warm water travels faster through the paper towel fibers.
- Choose shorter cups. Less distance means the colors meet sooner.
- Fold paper towels into long strips. Don't make them too thick, and trim them so they reach just from the bottom of one cup to the next.
- Leave the middle cup empty. That’s where the new color will appear as the water travels.
- Be patient. The “walking” happens faster than you think, but not instantaneously. Sometimes we start it, move on to something else, and come back throughout the day to check progress.
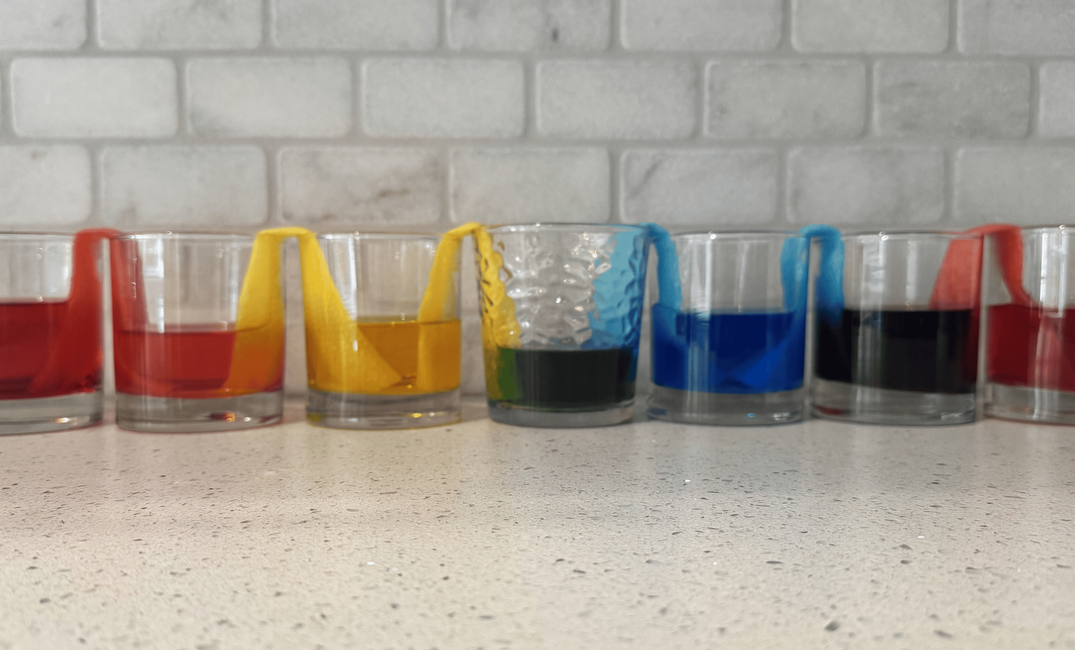
When it comes to color choices, I like to stick with primary colors (red, yellow, and blue) because they mix beautifully into secondary colors (orange, green, and purple). You can use a simple three-cup setup (two colors with one empty in the middle), or go bigger with five or seven cups for a full rainbow effect. The largest arrangement is red – empty – yellow – empty – blue – empty – red, but any combination of primaries will work.
Helping Students Think Like Scientists:
Noticing, Wondering, and Predicting
This is where the fun really begins.
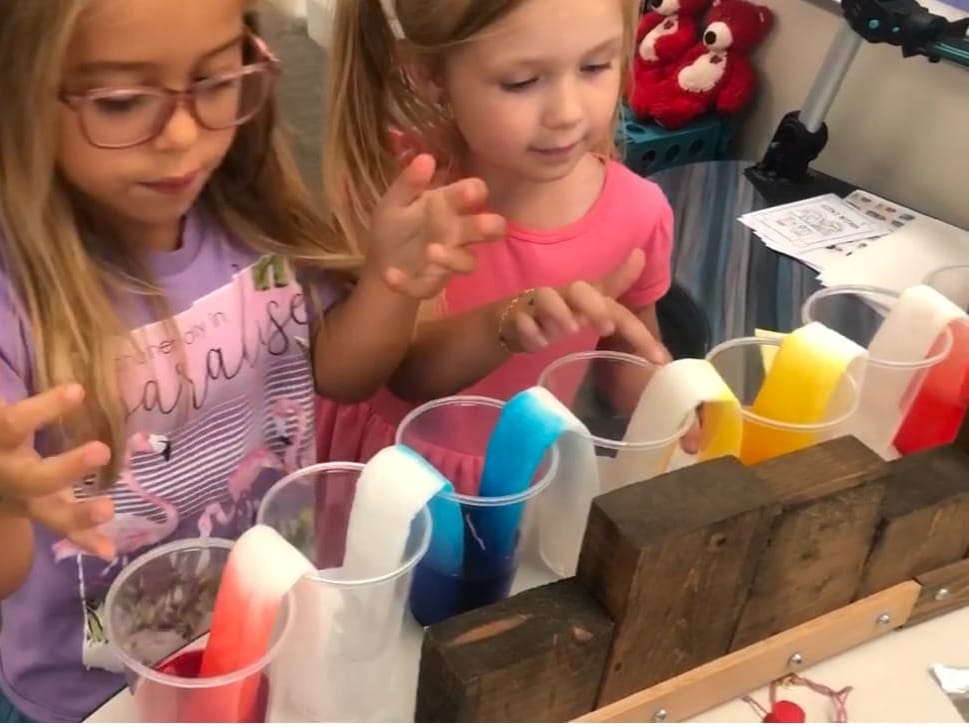
Once everything is set up, I gather the kids around and let them take it all in. I keep all of the materials separate at first, so they can clearly see the setup. I explain that we are going to learn how to make observations like scientists, and I’m very intentional with my words. I tell them that scientists use their five senses to make observations, and that we’ll be focusing on our sense of sight to see what happens.
Then comes the best part. I add the food coloring, and the room fills with "oohs" and "aahs." Once the excitement settles, I ask one simple but powerful question:
What do you notice?
At first, their answers are quick and simple:
“The water changed color."
"The color swirled around."
"The water is red now.”
“The cup is full.”
Then I get ready to add the folded paper towels into the water. Before I do, I ask what they already know about paper towels and water. Once they’ve shared their ideas, I ask for their predictions. I explain that scientists make predictions, and that a prediction is a smart guess. It means we take what we already know and use it to guess what might happen next.
Their predictions always make me smile, but I’ve learned to keep a straight face. Every idea gets the same reaction, because the goal isn’t to be right, it’s to think like a scientist. I restate their predictions using scientific language so they start to hear what scientific thinking sounds like.
Here are a few examples of what the kids say and how I restate it:
“It’s going to soak up the water.” ➜ "Madison thinks the paper towel will absorb the water."
“The towel will fall in.” ➜ "Jett thinks the paper towel might get too heavy and fall into the cup."
“It’s going to change colors.” ➜ "Missy thinks the colors will mix and make a new color in the middle cup."
“The paper towel will get soggy and break.” ➜ "Dominic thinks the paper towel will get soggy and rip apart when it gets wet."
Some of their predictions are spot on, and some are way off, but every single one gives me a chance to celebrate their thinking and remind them that scientists make guesses too. The important part is not whether they’re right, but that they’re thinking about what could happen and why.
Next, I stick the paper towels into the cups, and as the colors begin to climb, I model how to look closer, moving from short, surface-level comments to more detailed observations.
As we shift from noticing to wondering, I explain that scientists ask curious questions to help them figure things out, and I model how to turn an observation into a question. I mix in different question stems such as how, why, and what to show students that scientists ask all kinds of questions to explore their ideas.
Student: "The paper towel is changing colors!"
Me: Kamreigh notices that the paper towel is changing colors. I wonder how the color is moving?
Student: "I see the blue going up!"
Me: Devin notices that the blue water is climbing higher. I wonder why the blue is moving faster than the red?
Student: "The towel is wet and dry!"
Me: Summer notices the paper towel is getting wet, but it is still dry on the other side. I wonder if it will ever be wet all the way across?
Student: "It's going over the top!"
Me: Parker notices the red water is moving up and going over the top of the cup. I wonder how the water is able to move up? I wonder when the water will reach the other cup?
Student: "The blue is lighter on the towel."
Me: Jacob notices the blue on the paper towel isn't as dark as the blue in the cup. I wonder why the color looks lighter on the towel?
Students quickly realize that good scientists don’t just see things. They describe what they see carefully. Modeling gives them the knowledge of HOW and the confidence to trust their words. When I simply restate their question in modeling, I’m not telling them they’re wrong in how they said it, simply showing them a better way.
Modeling How Scientists Record What They See
Once students have had a chance to share what they notice and wonder, it’s time to show them how scientists record their thinking, not just with words but with pictures too. I intentionally model how to draw what we observe with detail and care. Young students don’t always have the confidence to draw. I hear a lot of “I don’t know how to draw that!” so I show them. We take it step-by-step, almost like a directed drawing video, and do it together.
As we draw, I explain how to add labels to show what we see. This process can easily be adapted for any grade level. In kindergarten, students might label using just the first sound they hear. In first grade, they might add one-word labels. By second grade, they can begin adding more detailed notes or sentences. (Show example picture here.)
Whatever you do, please don’t skip this step! Kids need to learn how to draw what they see, and they need to feel confident doing it. Building that confidence early makes a huge difference in how they record and communicate their observations later on.
Letting Them Explore: Connect and Extend
Once students have noticed and wondered, I let them explore, not by touching yet, but by watching closely and recording what they see. They grab a hand lens, a journal, and take a turn being the scientist, practicing what I modeled earlier. I give them time to look, to draw, to think, and to question.
If we have time, I will then let students take the steering wheel. If they want to test an idea, I say, "Yes!" They want to take the towels out? Okay! Try another color? Go for it! Add a little more water? Sure, let’s see what happens! Sometimes they ask, “Can we mix all the colors together?”, “What if we use straws instead?”, or “Would it still work with the school paper towels?” The goal isn’t a perfect result. It’s giving them space to explore their ideas and see themselves as real scientists at work. This step isn’t necessary, but it’s a great example of honoring students’ wonder questions, and showing how scientists explore further through extensions.
As students explore and test their ideas, my role begins to shift from leading to guiding. This is where I focus on helping them make sense of what they’re seeing and begin connecting their ideas.
Guiding Without Giving Answers and then Explaining
Once students have explored and shared their ideas, it’s time to bring it all together. I make this part fun by saying something like, “Now that you’ve been real scientific detectives, do you want to know what’s actually happening?” They excitedly agree every single time.
I keep my explanation simple and age-appropriate, using words they can understand but also introducing scientific vocabulary like absorb, soak, and mix. Here is a simple script for you:
Teacher Script: Explaining the Science Behind Walking Water
“Okay scientists, now that we’ve watched the colors move and mix, let’s talk about what’s really happening.”
“Do you see how the paper towel looks wet? The paper towel is full of tiny little holes and lines. You can’t see them, but they’re there. Those tiny holes work kind of like little straws. The water climbs up through them all by itself.”
“We call that 'soaking up' or 'absorbing.' Can you say absorb? That means the paper towel is drinking the water, kind of like you drink through a straw.”
“The water keeps soaking up until it reaches the top of the cup, and then it starts to go down into the next cup. When the red water and the blue water meet in the middle, they mix and make a new color. What color did ours make? That’s right, purple!”
“Warm water moves faster than cold water, so using warm water helps the colors travel more quickly. And short cups make it easier for the water to reach the next one.”
“So what we saw today was water moving, soaking, and mixing all on its own. That’s science in action. And you all figured it out by watching, wondering, and noticing just like real scientists.”
The Science Behind Walking Water (Teacher Background)
Walking Water is a simple but powerful demonstration of how water moves through materials using a process called capillary action. This happens when water molecules stick to other materials (adhesion) and to each other (cohesion). The fibers in the paper towel create tiny pathways that pull the water upward, even against gravity.
Here’s how it works:
- Adhesion makes the water cling to the paper towel fibers.
- Cohesion helps water molecules pull each other along.
- As more water moves upward, it eventually begins to “walk” over the edge of the cup into the next one.
- When two different colors meet in the middle, they mix to form a new color.
Warm water works best because the molecules move faster, which helps the water travel more quickly through the paper towel. Shorter distances also make the movement easier to see.
This experiment visually models several key Crosscutting Concepts and Science and Engineering Practices from NGSS and K–2 TEKS:
- Patterns: Students notice predictable color changes and flow.
- Cause and Effect: They explore why water moves and how distance or temperature changes the result.
- Asking Questions and Defining Problems: Students wonder, “Why did it move faster on one side?” or “What if we changed the paper towel?”
- Constructing Explanations: They share ideas about what they think is happening, supported by what they observed.
For students, this activity builds the habit of observing, wondering, and connecting, not just watching something “cool,” but realizing that every scientist starts by noticing what’s right in front of them.
Final Thoughts
I know what you're thinking. I don't have time to do all of this! There is no enough time in the school day! I live this same thought daily in my classroom, but this activity doesn’t all have to happen in one day. You can leave the setup overnight, take pictures to reference later, or record a short video to play back for your students.
Giving this activity time at the beginning of the year will save you time later. With practice, students become faster and more independent, and soon this process takes only minutes.
Remember: the goal isn’t to create a perfect rainbow of cups, it’s to show kids how scientists think. We’re teaching them to:
- Notice what’s happening by making detailed observations.
- Wonder about why it’s happening and ask smart questions.
- Explore ways to find answers to their questions.
- Explain their ideas through observations and evidence.
Those are the habits of scientists, and they can start with something as simple as paper towels and food coloring.
Try It in Your Classroom
If you’ve never used Walking Water as a thinking routine, try it this way:
- Set it up together. Let students predict what might happen.
- Model noticing and wondering. Say your thoughts aloud.
- Resist explaining too soon. Let them make sense of it first.
- Extend it. Try different colors, paper materials, or cup spacing.
- Reflect. Ask what new questions they have now.
Because when we teach students to think this way, we’re not just doing an experiment, we’re helping them see themselves as scientists.
Simple changes. Big impact.
Want More?
If this post inspired you, you’ll love Don’t Kill the Ants: 3 Practical Ways to Set Your Classroom Up for Wonder it’s all about helping kids notice, wonder, and stay curious.
Check out Don't Steal the Wonder to learn more about the inspiration and reasoning behind how I teach scientific thinking.
You can also find my “I Notice / I Wonder” Journal Pages (Freebie/Whole Set) on Teachers Pay Teachers to make this routine part of your daily science block.